Golden Image Based VMs
June 2024 (1473 Words, 9 Minutes)
With Linux, libvirt, and network namespaces
A while ago at $DAYJOB we had a need for dozens of instances of pairs of identical virtual machines. Even though this was back before Broadcomm bought VMWare and made it even less attractive, we were still inclined to use something that was free and open source. We quickly settled on libvirt based on the abundance of documentation and ease of use.
The Images
Using libvirt gave us some very useful features, for example support for QCOW2 for disk images. With QCOW2 we were able to make read only golden images of our VMs and then use those as backing files for our VMs with any new changes being written to a different image file that is unique to each VM. This not only saves significant disk space, it also makes it much easier to make sure all the VMs are the same configuration since they literally start from the same image.
The Network
With exact duplicate configurations that leads to some interesting network requirements. Either we needed to use DHCP and find a way to manage and track all that, or we needed to use static IPs, but in a very creative way. We chose creativity.
The golden images were given a static IP of 192.168.128.10 and 192.168.128.11 so every instance pair will have those exact IPs when deployed. To keep this from causing a massive pile of network errors we then tie the VM’s network interfaces to their own bridge. The bridge for the pair is also connected via veth interface to a network namespace that does NAT conversion translating the 192.168.128.10-11 addresses to 192.168.252.X and 192.168.253.X where the ‘X’ is the pair “ID” number. Another veth interface then connectes the namespaces to a single bridge where the traffic can pass through the host’s firewall and ultimately reach the physical network. Thist setup, while complex, gives us a way to easily script deployment of new VM pairs and have predictable IP addresses for all VMs as we go.
The Layout
Words on a page are nice and all, but sometimes a diagram really helps give the big picture. Here is a look at what this looks like.
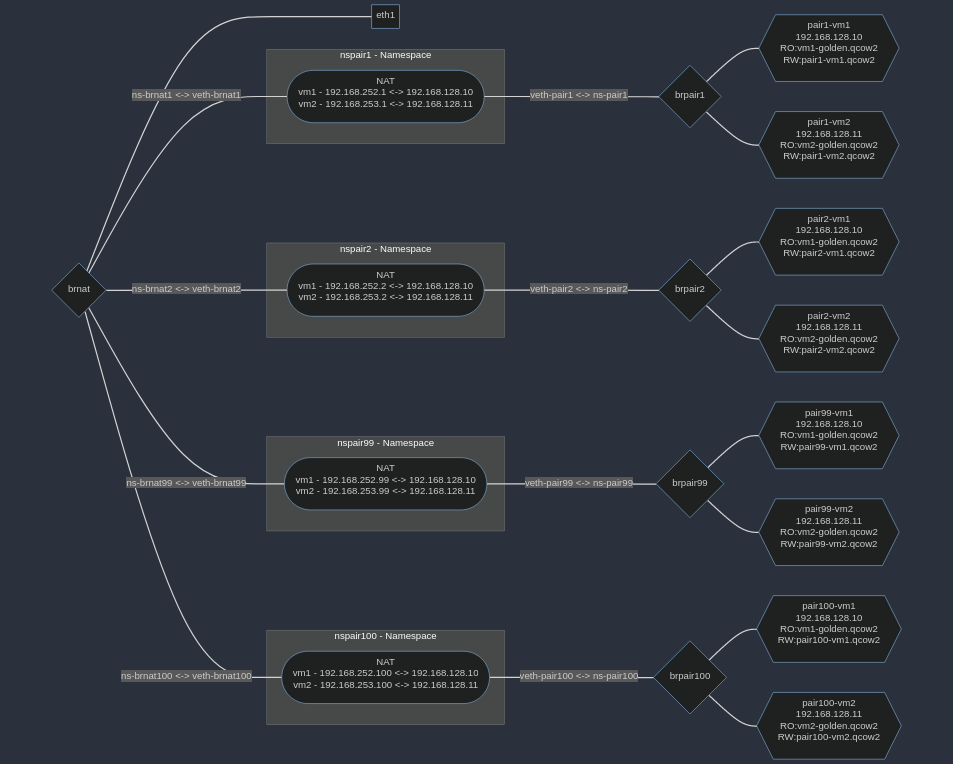
In our setup we have a bit more complexity involving BGP and a dummy interface, but this layout should be usable even in a home lab.
The Code
Now at this point you may be saying, “cool story bro, but how do you actually make this happen?” so let me share some scripts with you that can help you set this up for yourself.
Disclaimer: I’ve tweaked these scripts to remove any $DAYJOB specific info as well as to make these more generic to make them usable by the widest number of people as possible. Due to that I can’t promise these will work as-is so please don’t run them blindly. There is no dependency checking in these scripts. If you are missing a necessary tool it will not detect that and the script will fail, probably leaving your network configuration a mess.
Known Debian dependencies: nft, bridge-utils, qemu-system, qemu-utils, libvirt-clients, libvirt-daemon-system, libvirt-daemon, virtinst dnsmasq
There may be additional requirements that I missed, but that should be the bulk of the needed packages.
Setup the network on the Host
To setup the network we need to do a few steps.
- Create the virtual (veth) interface pairs and bridges
- Create the network namespaces and populate the NFTables nat rules
- Bind the veth interfaces to the corresponding namespaces and set IPs
The following perl script will do just that for instances from 1-$maxpairid (99 in this example). This does take some time, and it puts a surprisingly significant load on the host while it’s processing. An improvement I want to make in the future is to combine this script with the VM deployment script so the network and VM is setup all in one go.
#!/usr/bin/perl
use strict;
use warnings;

my $maxpairid = 99;

# Create veth pair interfaces for bridges and namespaces
printf "### Interface Creation Begin ###\n";
for (my $i=1;$i<=$maxpairid;$i++){
    print `ip link add veth-pair$i type veth peer name ns-pair$i`;
    print `ip link set veth-pair$i master brpair$i`;
    print `ip lnk set veth-pair$i up`;
    print `ip link add veth-brnat$i type veth peer name ns-brnat$i`;
    print `ip link set veth-brnat$i master brnat`;
    print `ip link set veth-brnat$i up`;
}
printf "### Interface Creation End ###\n";
print `sleep 2`; # Pause to ensure all steps have taken affect.

# Create and setup namespaces
printf "### Namespace Creation Begin ###\n";
for (my $i=1;$i<=$maxpairid;$i++){
    print `ip netns add nspair$i`;
    print `ip netns exec nspair$i nft flush ruleset`;
    print `ip netns exec nspair$i nft add table natns`;
    print `ip netns exec nspair$i nft add chain natns prerouting '{type nat hook prerouting priority -100; }'`;
    print `ip netns exec nspair$i nft add rule natns prerouting iifname ns-brnat$i ip daddr 192.168.253.$i counter dnat to 192.168.128.11`;
    print `ip netns exec nspair$i nft add rule natns prerouting iifname ns-brnat$i ip daddr 192.168.252.$i counter dnat to 192.168.128.10`;
    print `ip netns exec nspair$i nft add rule natns prerouting counter`;
    print `ip netns exec nspair$i nft add chain natns postrouting '{ type nat hook postrouting priority 100; }'`;
    print `ip netns exec nspair$i nft add rule natns postrouting oifname ns-brnat$i ip saddr 192.168.128.11 counter snat to 192.168.253.$i`;
    print `ip netns exec nspair$i nft add rule natns postrouting oifname ns-brnat$i ip saddr 192.168.128.10 counter snat to 192.168.252.$i`;
    print `ip netns exec nspair$i nft add rule natns postrouting counter`;
    print `ip netns exec nspair$i echo "1" > /proc/sys/net/ipv4/ip_forward`; # alternative command: "ip netns exec nspair$i sysctl net.ipv4.ip_forward=1;"
}
printf "### Namespace Creation End ###\n";
print `sleep 2`; # Again pause to let everything take affect

# Bind interfaces inside namespaces, assign IPs, and bring interfaces up
printf "### Bind NS Interfaces Begin ###\n";
for (my $i=1;$i<=$maxpairid;$i++){
    print `ip link set ns-pair$i netns nspair$i`;
    print `ip netns exec nspair$i ip addr add 192.168.128.1/23 dev ns-pair$i`;
    print `ip netns exec nspair$i ip link set ns-pair$i up`;
    print `ip link set ns-brnat$i netns nspair$i`;
    print `ip netns exec nspair$i ip addr add 192.168.252.$i/23 dev ns-brnat$i`;
    print `ip netns exec nspair$i ip addr add 192.168.253.$i/23 dev ns-brnat$i`;
    print `ip netns exec nspair$i ip link set ns-brnat$i up`;
    print `ip netns exec nspair$i ip route add 0.0.0.0/0 via 192.168.252.254`;
}
printf "### Bind NS Interfaces End ###\n";
Deploying Virtual Machines
For setting up the VMs we want a few things in place.
- There needs to be the golden image for each VM type. This script expects the golden image to then be symlinked to a file called “latest-vm1” and “latest-vm2”. I chose this method so we can avoid needing to update the script if we ever want to update the actual golden image file. This script also allows you to specify an alternate golden image as well.
- This script will verify that necessary bridges exists
#!/usr/bin/perl
use strict;
use warnings;
use Getopt::Long;
use Pod::Usage;

# Expected to exist:
#   brpair[##]      -   bridge connecting vm1, vm2, and pair namespace
#   brnat           -   bridge connecting veth-brnat[##] to the host


my $help = 0;
my $type;
my ($vmid,$goldendisk);

## Defines Default VM CPUs and RAM
my $cpus = "2";
my $ram = "4000";

pod2usage("\n$0: No arguments given.\n") if (@ARGV == 0);
GetOptions( "usage|help" => \$help
          , 'cpu=i' => \$cpus
          , 'memory=i' => \$ram
          , 'disk|goldendisk=s' => \$goldendisk
          , 'vmid=i' => \$vmid
          , 'type=s' => \$type
          ) or pod2usage(2);
pod2usage(1) if $help;

# Set default golden image
if (!$goldendisk){$goldendisk = readlink("/var/lib/libvirt/images/latest-$type");} # Reference a symlink '/var/lib/libvirt/images/latest-<vm1/vm2>'

pod2usage("Must set option vmid and type.") if (!$type or !$vmid or !$goldendisk);

my $vmdir = "/var/lib/libvirt/images/vmid$vmid-$type";
my $vmdisk = "vmid$vmid-$type.qcow2";


## Verify VMs *don't* exist
my $vm = "vmid$vmid-$type";
die "Error: VM $vm already exists.\n" if (readpipe("virsh list | grep $vm") ne "");


## Verify bridges exist
my @bridges = ("brpair$vmid","brnat");
foreach my $bridge (@bridges){
    my $brresult = readpipe("ip link | grep $bridge");
    die "Error: $bridge does not exist. Aborting\n" if($brresult eq "");
}


## Verify sufficient disk space
my $dfresult=`df -m --output=avail /var/lib/libvirt | awk 'NR > 1'`; #Get available disk space in megabytes
die "Error: Insufficient disk space. Require 100GB free to continue.\nAborting\n" if($dfresult < 100000);


## Verify sufficient available memory
my $totalram = $ram;
my $availram = `free -m | grep Mem: | awk '{print \$7}'`;
die "Error: Insufficient available memory. Requires at least $totalram MB of free host memory.\n"if($availram < $totalram);
die "Error: Minimum VM memory should be 4000MB+\n"if($totalram < 4000);


# Create VM COW Images
printf "###################### COW Image Creation Begin #############################\n";
printf "Creating COW Images\nGolden Images:\n\t$goldendisk\nVM COW Images:\n\t$vmdir/$vmdisk\n\n";
unless(-e $vmdir){
    print `mkdir $vmdir`;
}
print `qemu-img create -f qcow2 -b $goldendisk -F qcow2 $vmdir/$vmdisk`;
printf "######################  COW Image Creation End  #############################\n\n";


print `sleep 2`;


# Spawn VM
printf "###################### VM Creation Begin #############################\n";
printf "Creating VM vmid$vmid-$type\nRAM: $ram\nCPU: $cpus\n";

if($type eq 'vm1'){
    print `virt-install --import --name vmid$vmid-$type --memory $ram --vcpus $cpus --cpu host --disk format=qcow2,path=$vmdir/$vmdisk --os-type=linux --os-variant=ubuntu18.04 --graphics vnc --noautoconsole --autostart --network bridge=brpair$vmid --console pty,target_type=virtio`;
} elsif($type eq 'vm2'){
    print `virt-install --import --noreboot --name vmid$vmid-$type --memory $ram --vcpus $cpus --cpu host --disk format=qcow2,path=$vmdir/$vmdisk --os-type=linux --os-variant=ubuntu18.04 --graphics vnc --noautoconsole --network bridge=brpair$vmid --console pty,target_type=virtio`;
} else {
    die "Error: Incorrect type\n";
}
printf "######################  VM Creation End  #############################\n\n";


exit;

__END__

=head1 NAME

deploy-vm - Deploy a new vm1 or vm2 instance

=head1 SYNOPSIS

deploy-vm [options]

 Options:
   -vmid VMID  [1-254]                           the vmid number to use           (Required)
   -type TYPE    [vm1 | vm2]                   the instance type                (Required)
   -cpu NUM      [default: 2]                      number of cpu cores to allocate
   -disk PATH   [default: latest-<type>]    full path to golden image
   -memory MB    [default: 4000, min: 4000]        amount of ram to allocate in MB
   -help                                           print help and exit

This will deploy a new vm1 or vm2 instance.

B<Note:> New vm2 instances will not autostart and must be started manually with 'virsh start vmid[VMID]-vm2'.

=cut